Tutorial
In this guide we’ll create a Postgres setup with two nodes, a primary and a standby. Then we’ll add a second standby node. We’ll simulate failure in the Postgres nodes and see how the system continues to function.
This tutorial uses docker compose in order to separate the architecture design from some of the implementation details. This allows reasoning at the architecture level within this tutorial, and better see which software component needs to be deployed and run on which node.
The setup provided in this tutorial is good for replaying at home in the lab. It is not intended to be production ready though. In particular, no attention have been spent on volume management. After all, this is a tutorial: the goal is to walk through the first steps of using pg_auto_failover to implement Postgres automated failover.
Pre-requisites
When using docker compose we describe a list of services, each service may run on one or more nodes, and each service just runs a single isolated process in a container.
Within the context of a tutorial, or even a development environment, this matches very well to provisioning separate physical machines on-prem, or Virtual Machines either on-prem on in a Cloud service.
The docker image used in this tutorial is named pg_auto_failover:tutorial.
It can be built locally when using the attached Dockerfile found within the GitHub repository for
pg_auto_failover.
To build the image, either use the provided Makefile and run make build,
or run the docker build command directly:
$ git clone https://github.com/hapostgres/pg_auto_failover
$ cd pg_auto_failover/docs/tutorial
$ docker compose build
Postgres failover with two nodes
Using docker compose makes it easy enough to create an architecture that looks like the following diagram:
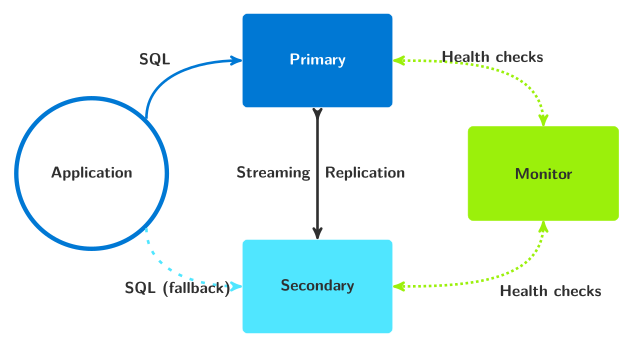
pg_auto_failover architecture with a primary and a standby node
Such an architecture provides failover capabilities, though it does not provide with High Availability of both the Postgres service and the data. See the Multi-node Architectures chapter of our docs to understand more about this.
Each node in the cluster is described by a small pg_autoctl_node.ini
file that is bind-mounted into its container. There are two files:
[node]
kind = monitor
port = 5432

[postgresql]
pgdata = /var/lib/postgres/pgaf

[options]
ssl  = self-signed
auth = trust
[node]
kind = postgres
port = 5432

[postgresql]
pgdata = /var/lib/postgres/pgaf

[monitor]
pguri = postgresql://autoctl_node@monitor/pg_auto_failover

[settings]
candidate_priority = 50
replication_quorum = true

[options]
ssl        = self-signed
auth       = trust
pg_hba_lan = true
The monitor file sets kind = monitor; it has no [monitor] section
because the monitor is not itself a client of a monitor. The postgres file
is shared by every data node — the node’s name and hostname are
omitted, so they default to the container hostname set by Docker Compose
(node1, node2, node3).
The docker compose definition that assembles these pieces is:
 1x-node: &node
 2  build:
 3    context: ../..
 4    dockerfile: Dockerfile
 5    tags:
 6      - pg_auto_failover:tutorial
 7  volumes:
 8    - /var/lib/postgres
 9    - ./ini/postgres.ini:/etc/pgaf/node.ini:ro
10  environment:
11    PGUSER: tutorial
12    PGDATABASE: tutorial
13  expose:
14    - 5432
15  command: pg_autoctl node run
16
17services:
18
19  app:
20    build:
21      context: .
22      dockerfile: Dockerfile.app
23    environment:
24      PGUSER: tutorial
25      PGDATABASE: tutorial
26      PGHOST: node1,node2
27      PGPORT: 5432
28      PGAPPNAME: tutorial
29      PGSSLMODE: require
30      PGTARGETSESSIONATTRS: read-write
31
32  monitor:
33    image: pg_auto_failover:tutorial
34    volumes:
35      - /var/lib/postgres
36      - ./ini/monitor.ini:/etc/pgaf/node.ini:ro
37    expose:
38      - 5432
39    command: pg_autoctl node run
40
41  node1:
42    <<: *node
43    hostname: node1
44
45  node2:
46    <<: *node
47    hostname: node2
48
49  node3:
50    <<: *node
51    hostname: node3
Every service runs the same entry-point — pg_autoctl node run — with a
different ini file bind-mounted at /etc/pgaf/node.ini. On first start
the command creates the Postgres cluster and registers the node; on
subsequent starts it picks up the existing cluster and runs the supervisor.
Either way the container never needs updating to change node configuration:
edit the ini file and restart.
To start the two-node cluster run:
$ docker compose up app monitor node1 node2
While the nodes are being provisioned you can run the following command and
have a dynamic dashboard to follow what’s happening. The following command
is like top for pg_auto_failover:
$ docker compose exec monitor pg_autoctl watch
After a little while, you can run the pg_autoctl show state command and see a stable result:
$ docker compose exec monitor pg_autoctl show state

 Name |  Node |  Host:Port |       TLI: LSN |   Connection |      Reported State |      Assigned State
------+-------+------------+----------------+--------------+---------------------+--------------------
node2 |     1 | node2:5432 |   1: 0/3000148 |   read-write |             primary |             primary
node1 |     2 | node1:5432 |   1: 0/3000148 |    read-only |           secondary |           secondary
We can review the available Postgres URIs with the pg_autoctl show uri command:
$ docker compose exec monitor pg_autoctl show uri
         Type |    Name | Connection String
 -------------+---------+-------------------------------
      monitor | monitor | postgres://autoctl_node@58053a02af03:5432/pg_auto_failover?sslmode=require
    formation | default | postgres://node2:5432,node1:5432/tutorial?target_session_attrs=read-write&sslmode=require
Add application data
Let’s create a database schema with a single table, and some data in there.
$ docker compose exec app psql
-- in psql

CREATE TABLE companies
(
  id         bigserial PRIMARY KEY,
  name       text NOT NULL,
  image_url  text,
  created_at timestamp without time zone NOT NULL,
  updated_at timestamp without time zone NOT NULL
);
Next download and ingest some sample data, still from within our psql session:
\copy companies from program 'curl -o- https://examples.citusdata.com/mt_ref_arch/companies.csv' with csv
( COPY 75 )
Our first failover
When using pg_auto_failover, it is possible (and easy) to trigger a failover without having to orchestrate an incident, or power down the current primary.
$ docker compose exec monitor pg_autoctl perform switchover
14:57:16 992 INFO  Waiting 60 secs for a notification with state "primary" in formation "default" and group 0
14:57:16 992 INFO  Listening monitor notifications about state changes in formation "default" and group 0
14:57:16 992 INFO  Following table displays times when notifications are received
    Time |  Name |  Node |  Host:Port |       Current State |      Assigned State
---------+-------+-------+------------+---------------------+--------------------
14:57:16 | node2 |     1 | node2:5432 |             primary |            draining
14:57:16 | node1 |     2 | node1:5432 |           secondary |   prepare_promotion
14:57:16 | node1 |     2 | node1:5432 |   prepare_promotion |   prepare_promotion
14:57:16 | node1 |     2 | node1:5432 |   prepare_promotion |    stop_replication
14:57:16 | node2 |     1 | node2:5432 |             primary |      demote_timeout
14:57:17 | node2 |     1 | node2:5432 |            draining |      demote_timeout
14:57:17 | node2 |     1 | node2:5432 |      demote_timeout |      demote_timeout
14:57:19 | node1 |     2 | node1:5432 |    stop_replication |    stop_replication
14:57:19 | node1 |     2 | node1:5432 |    stop_replication |        wait_primary
14:57:19 | node2 |     1 | node2:5432 |      demote_timeout |             demoted
14:57:19 | node2 |     1 | node2:5432 |             demoted |             demoted
14:57:19 | node1 |     2 | node1:5432 |        wait_primary |        wait_primary
14:57:19 | node2 |     1 | node2:5432 |             demoted |          catchingup
14:57:26 | node2 |     1 | node2:5432 |             demoted |          catchingup
14:57:38 | node2 |     1 | node2:5432 |             demoted |          catchingup
14:57:39 | node2 |     1 | node2:5432 |          catchingup |          catchingup
14:57:39 | node2 |     1 | node2:5432 |          catchingup |           secondary
14:57:39 | node2 |     1 | node2:5432 |           secondary |           secondary
14:57:40 | node1 |     2 | node1:5432 |        wait_primary |             primary
14:57:40 | node1 |     2 | node1:5432 |             primary |             primary
The new state after the failover looks like the following:
$ docker compose exec monitor pg_autoctl show state
 Name |  Node |  Host:Port |       TLI: LSN |   Connection |      Reported State |      Assigned State
------+-------+------------+----------------+--------------+---------------------+--------------------
node2 |     1 | node2:5432 |   2: 0/5002698 |    read-only |           secondary |           secondary
node1 |     2 | node1:5432 |   2: 0/5002698 |   read-write |             primary |             primary
And we can verify that we still have the data available:
docker compose exec app psql -c "select count(*) from companies"
  count
 -------
     75
 (1 row)
Multiple Standbys Architectures
The docker-compose.yml file comes with a third node that you can bring
up to obtain the following architecture:
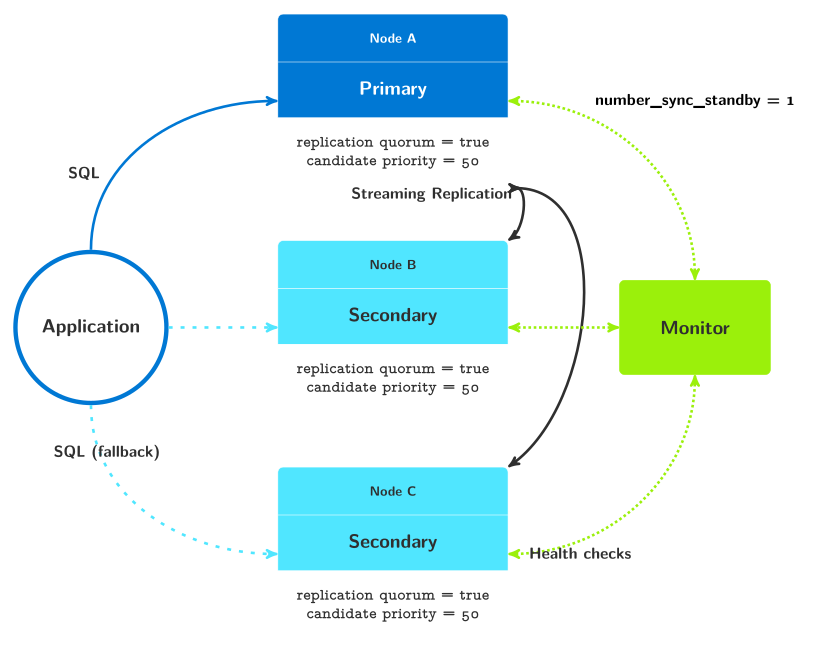
pg_auto_failover architecture with a primary and two standby nodes
Adding a second standby node
To run a second standby node, or a third Postgres node, simply run the following command:
$ docker compose up -d node3
We can see the resulting replication settings with the following command:
$ docker compose exec monitor pg_autoctl show settings

  Context |    Name |                   Setting | Value
----------+---------+---------------------------+-------------------------------------------------------------
formation | default |      number_sync_standbys | 1
  primary |   node1 | synchronous_standby_names | 'ANY 1 (pgautofailover_standby_1, pgautofailover_standby_3)'
     node |   node2 |        candidate priority | 50
     node |   node1 |        candidate priority | 50
     node |   node3 |        candidate priority | 50
     node |   node2 |        replication quorum | true
     node |   node1 |        replication quorum | true
     node |   node3 |        replication quorum | true
Editing the replication settings while in production
Because node3 uses the same postgres.ini as node1 and node2, its
candidate_priority starts at 50. To make node3 a read-only standby
that is never promoted there are two ways to proceed.
Direct command — takes effect immediately on the running cluster:
$ docker compose exec node3 pg_autoctl set candidate-priority 0 --name node3
This reaches into the running supervisor and updates the setting on the monitor in one step. It is the fastest option when you need an immediate change on a live cluster.
Declarative ini file — the persistent, version-controlled option.
Because node3 shares postgres.ini with the other two nodes, you first
create a dedicated ini file for it:
# tutorial/ini/node3.ini
[node]
kind = postgres
port = 5432

[postgresql]
pgdata = /var/lib/postgres/pgaf

[monitor]
pguri = postgresql://autoctl_node@monitor/pg_auto_failover

[settings]
candidate_priority = 0
replication_quorum = true

[options]
ssl        = self-signed
auth       = trust
pg_hba_lan = true
Then update the node3 service in docker-compose.yml to mount this
file instead of the shared one:
node3:
  <<: *node
  hostname: node3
  volumes:
    - /var/lib/postgres
    - ./ini/node3.ini:/etc/pgaf/node.ini:ro
Changing the volumes: list requires recreating the container — Docker
cannot swap a bind mount into a running container. Run:
$ docker compose up -d node3
Docker Compose stops node3, recreates it with the new mount, and starts it
again. pg_autoctl node run detects that the Postgres cluster already
exists inside the volume, reads node3.ini, and calls pg_autoctl node
apply before exec’ing into the supervisor. The apply step calls
pg_autoctl set node candidate-priority 0, registering the change on the
monitor. node3 rejoins the formation as a secondary within a few seconds.
Note
Once node3 has its own ini file mounted, any further edits to
tutorial/ini/node3.ini on the host are picked up live by the running
supervisor — Docker bind mounts reflect host-side writes immediately, and
the supervisor’s file watcher applies mutable fields (candidate_priority,
replication_quorum, ssl) without restarting the container.
Verify with:
$ docker compose exec monitor pg_autoctl show settings

  Context |    Name |                   Setting | Value
----------+---------+---------------------------+-------------------------------------------------------------
formation | default |      number_sync_standbys | 1
  primary |   node1 | synchronous_standby_names | 'ANY 1 (pgautofailover_standby_1, pgautofailover_standby_3)'
     node |   node2 |        candidate priority | 50
     node |   node1 |        candidate priority | 50
     node |   node3 |        candidate priority | 0
     node |   node2 |        replication quorum | true
     node |   node1 |        replication quorum | true
     node |   node3 |        replication quorum | true
Then in a separate terminal (but in the same directory, because of the way docker compose works with projects), you can run the following watch command:
$ docker compose exec monitor pg_autoctl watch
And in the main terminal, while the watch command output is visible, you can run a switchover operation:
$ docker compose exec monitor pg_autoctl perform switchover
Getting familiar with those commands one of you next steps. The manual has coverage for them in the following links:
Cleanup
To dispose of the entire tutorial environment, just use the following command:
$ docker compose down
Alternative: interactive cluster with pgaftest
The same two-node cluster from this tutorial can be started with a single
pgaftest command, without writing any compose files or ini files by hand.
pgaftest generates both from the spec file, starts the cluster, and opens
a tmux session so you can explore it immediately.
The following spec file describes the tutorial topology:
# Interactive tutorial cluster
#
# A two-node HA cluster ready for hands-on exploration.  There are no test
# steps — this spec is only meant to be used with `pgaftest setup --tmux`.
#
# Usage:
#   pgaftest setup tests/tap/specs/interactive_tutorial.pgaf --tmux
#
# The setup block waits until you have a healthy primary + secondary, then
# pgaftest hands control to you.  The three tmux panes let you observe the
# cluster in real time:
#
#   top    — docker compose logs -f  (live container logs)
#   middle — pg_autoctl watch        (node state dashboard)
#   bottom — bash in node1           (run pg_autoctl / psql commands)
#
# When you're done:
#   pgaftest down --work-dir /tmp/pgaftest/interactive_tutorial
#
# Things to try from the bottom pane:
#
#   # connect to the primary
#   psql -h node1 -U postgres
#
#   # trigger a manual failover
#   pg_autoctl perform failover --monitor postgresql://autoctl_node@monitor/pg_auto_failover
#
#   # watch the FSM transition live (middle pane updates automatically)
#
#   # reconnect to the new primary after failover
#   psql -h node2 -U postgres

cluster {
    monitor
    formation {
        node1
        node2
    }
}

setup {
    wait until primary, secondary  timeout 120s
    promote node1
}

teardown {
    compose down
}
Start it with:
$ pgaftest setup docs/tutorial/interactive_tutorial.pgaf --tmux
Three tmux panes open as soon as the cluster is healthy:
top —
docker compose logs -f(live container output)middle —
pg_autoctl watchstate dashboardbottom — interactive
bashinnode1
From the bottom pane you can trigger a failover:
pg_autoctl perform failover \
    --monitor postgresql://autoctl_node@monitor/pg_auto_failover
Watch the middle pane as the FSM transitions unfold in real time. When you are done, tear down the cluster from any shell:
$ pgaftest down --work-dir /tmp/pgaftest/interactive_tutorial
For the full pgaftest reference see pgaftest.
Next steps
The docker compose setup in this tutorial is a good playground for
understanding pg_auto_failover’s behaviour. For production container and
Kubernetes deployments, the same pg_autoctl node run entry-point scales
directly: store your ini files in a ConfigMap or alongside your Compose
file, bind-mount them, and live reconfiguration handles the rest.
See pg_autoctl node for the full property reference and mutability table, and the Container and Kubernetes Deployments section of the Operations guide for production patterns.